Showing posts with label Misc Projects. Show all posts

Tuesday, May 14, 2013

Altered Vintage Style Frame


I got these cute little frames from oriental trading company so that I could alter them as needed.
 I decided to use some Stampin Up paper I found along with some cute embellishments.  The paper is inked up to give it that old feel and some gold flakes were added.  Before adding ebellies, I used mod podge to seal the deal and keep the paper protected.


Have a great week,
Meighen

Sunday, February 24, 2013

Altered Wood Box

Hi everyone, just a really easy project using only a few things.

Here is what you will need:

Mod Podge in Matte and glitter
Scallop Punches of various sizes
Wood box ( i got mine at Joanns for a buck)
A little time.

Put it all together and what do you get.........................................

< -------------------Goes from this......

To this------------------------------->


 Each side was done on different days to allow for complete drying.  I used my Mod Podge as my adhesive and sealer.  Matte was used first on the bottom and top of the punches and then after that dried I used the Glitter Mod Podge to add sparkle.

You can even use your Cuttle Bug to add dimension to the paper before punching it out too.

Hope this gives you plenty of ideas.

Hugs and Blessings,
Meighen

Thursday, October 11, 2012

Bosses Day is on the 16th

HI everyone.  Welcome back for a fun new project that I know you will love.  As you may or may not know  Bosses week is October 16th this year.  My coworkers and I are celebrating it in style at the hospital where we work. As a little added special touch I decided to make a sign for my boss Marissa to hang on here door.  Luckily, we like our boss .  lol :D

Here is what you will need:

This chipboard,  (thin enough to cut on the cricut)
Hello Kitty Font (cut @ 1 inch i think)
pumpkin ink
stickles
glue
little roses
2 sizes of butterfly punches
Ribbon
bling
Gypsy

 The letters are welded together on the gypsy.
The paper was cut out 2 times in order to cover  the front and back.   The back just has white paper to cover the chipboard.  The edges were inked with the pumpkin and stickles were used to trace around hte edges.
I connected the 3 pieces of welded signage with ribbon using large glue dots.  The little roses were added along with the butterflies and bling as embellishments.


I hope my boss likes it and you get some inspiration as well.
Hugs and Blessings,
Meighen

Thursday, October 4, 2012

Nana's Scrap Spot 2yr Blogaversary Bog Hop

Welcome everyone to Nana's Scrap Spot's Blog Hop.  We are all celebrating her two year blogaversary.  Isn't that super exciting? 

Happy Blogaversary to You , Happy Blogaversary to You, Happy Blogaversary to Nana's Scrap Spot, Happy Blogaversary to You and many moooorrrreeeeee.

Now, you should have come here from Maria's Blog.  If not you can start here with our hostess Miranda at   http://www.nanasscrapspot.com/.

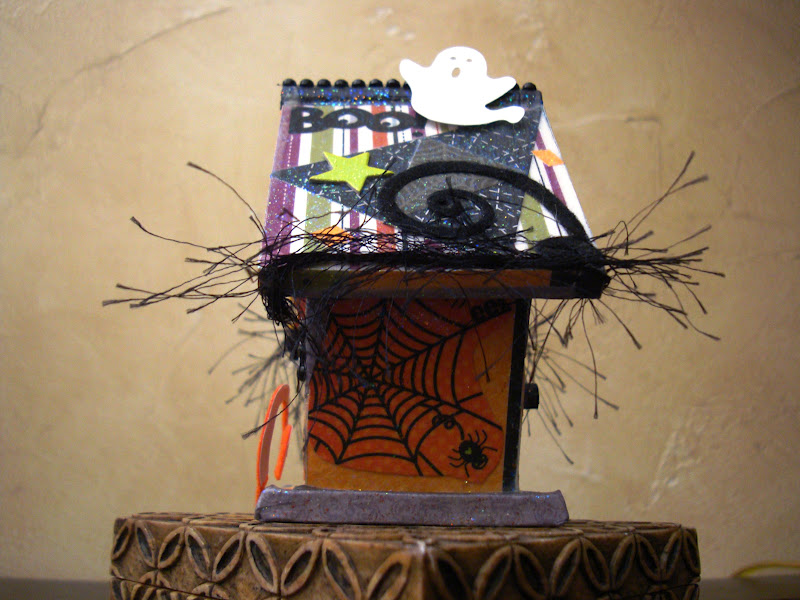
For this hop, she has decided to make the hop theme a free for all/ anything goes project.  I have decided to alter another bird house.  

The birdie couple that moved in to the last one just love Halloween so  much that they decided to hang up the ghoulish decor early.  These birds works for a couple of days to get things finished.  I must say they really did an awesome job. They should come and decorate my house.  lol


They Started of by taking the other decor off of the wooden birdhouse and added a whole bunch of scrap Halloween paper around the exterior using Mod Podge.  After they let that dry they added a glitter coating of Mod Podge and a glow in the dark layer of  Mod Podge.  They wanted everyone in the bird community to see it at night too.


After all of the Mod Podge had dried, they wanted to add some fun fur to the outside edges of the roof with some glue and also some stickers and ghost punches.  The ridge of the roof has some black bling on it and was colored with a black marker.  Orange Stickles was used on the peak front and back, the opening into the bird house as well as the pumpkin on the side .
They did a great job with the decor.  I wonder if they will decorate for fall and winter or Christmas.

That concludes this tweet project.


BLOG CANDY ALERT

What celebration would be complete without gifts, right! Well not to worry, we have gifts.....one lucky person will receive a $25 gift card from Michael's Arts and Crafts and if that isn't enough KaDoodle Bug Designs is offering a $15 gift certificate on regular price patters. To be eligible to win, please leave a comment on each hop post and please head over to KaDoodle Bug Designs Facebook Page, click LIKE and leave a comment: http://www.facebook.com/kadoodlebugdesigns.


As a thanks for stopping by I am also giving away some blog candy.  All you have to do is join my blog if you would like and leave me a comment on this post.  Easy peasey.


Your next stop is Christine- http://hotberrydesigns.blogspot.com/

Happy Hopping


Blog Candy


Here is the blog list:


Tuesday, August 28, 2012

Altered Frame

This cute frame was altered using glitter Mod Podge, rusty metal stars, pearls, brads and some cute yellow flowers.  It already came with the green paint.  I just added my own bit of flair to it.  So super simple.  all you need to do is add the Mod Podge and let dry.  Use glue or hot glue to adhere the embellishments.  Easy Peesey

Hugs and Blessings,
Meighen

Saturday, August 4, 2012

Wooden Bird House


HI everyone.  It has been way too long since I have posted.  I must apologize, but life does have priority.  I so miss my crafting.  This summer I have been playing catch up on all the things I let go while I was in school this past fall and spring semester.  Mostly pertaining to the house.  You know the kind of stuff like painting garage door trim, spring cleaning, power washing, yard work and a few other things.  Also I have been taking a Bible Study Class the last 5 weekends in a row which has taken time there along with working part time.  A fun filled summer.

BEFORE
Now back to crafting.  Here is a darling bird house I decorated.  I decorated it using the scraps I had laying around just like a bird would do with its nest.  I also used ribbon, pearls ans a couple of flowers.

The bird house  was purchased at Joann,s for a buck.  Can't beat that.

I used Mod Podge to glue on the paper and also Mod Podge Glitter to give it a nice sparkle coating.  I used glue to adhere the ribbon and pearls around the opening and red tape for the ribbon and pearls around the base.  This was an easy project that I will be giving to someone who needs a little pick me up.  Hope they like it.

BEFORE
AFTER


I hope you all have enjoyed the bird house.  More crafts to come.
TTFN
Hugs and Blessings,
Meighen

Thursday, April 26, 2012

POP DT Monthly Challenge

POP DT Monthly Link UP Party

This months theme is all about those adorable babies.  Your link up project can be anything baby related..  This can include, LO's, cards, shower gifts absolutely anything and any color.  When you are done you can post it on the Patches of Pink Link Up post so we can all see what you have created.  Click HERE to head there now and see post your project and see the other DT projects for inspiration.

My project is this darling little onesie gift box.  It is cut out using the fit to page button on your cricut with the Tags Bags Boxes and More 2 cartridge.  BTW my new fav cart.

I also used the Stretch Your Imagination Cart cutting the bear out at 3 inches.  As you can see I inked him up and tied some cloths pins together with ribbon as my embellishment.

The sentiment is also cut out using the same cart as the bear.  You can cut it to any size you want.  I added some stickles glitter glue and a little bit of bling to finish it off.  You know I have to have my bling.  :D

Thanks for stopping by.
Hugs and Blessings,
Meighen

Wednesday, January 25, 2012

Love is in the Air Tag

Give that special someone the gift of a keep sake this year with a beautiful hand made tag.  This tag was inspired by the Scrappy Moms Love Note Stamp set.

Item used:
Large tag or any size you want

Ink:
Mellow Moss
Perfect Plum
Staze On

StampSets:
Scrappy Moms Love Notes
Stampin UP
   Aviary
   Hello Doily
   En Francais

Other Stuff:
Embossing Powder
Heat Gun
Hardware
Ribbon Twine
Flowers
hearts cut by cricut and embossed with cuttle bug swiss dots folder and inked


 Age your tag with ink then Stamp your images en francais first then doily then emboss.  Stamp the aviary stmaps with staze on.  Add your embellishments.


Enjoy your work of art.
Blessings,
Meighen


challenges

http://ssdschallenge.blogspot.com/2012/01/have-heart.html

http://stampinsistersinchrist.blogspot.com/2012/01/challenge-123-prov-33.html

Saturday, January 21, 2012

Valentine Tin

Have you ever wondered what you could to with those coffee cans?  Well I have a great project you can enjoy making.  Your kids can collect their Valentines in it or you can use it for decor.


 Ingredients:
coffee tin
Valentines paper
gypsy
   Martha Stewart Holiday Cakes Cart
      Hearts @ 1.5 inches Letters @ 1.25 inches
Stickles
Cuttlebug with swiss dots folder
pearls
ribbon
small Valentine stickers
tacky tape and glue
 First you have to measure and cut the paper to size and stick it down with some good glue.  I used tacky red tape for the ribbon and Helmar 450 Quick Dry adhesive. 
Next cute out your shapes and words.  Glue them down or use glue dots to adhere them down.
Last, add stickles stickers and pearls.  That's it.  Easy easy easy :D


Hope you enjoyed this uber cute tin and find it inspirational. 
Hugs and Blessings,
Meighen

Challenges used for:
http://justusgirlschallenge.blogspot.com/2012/01/just-us-girls-color-challenge-120.html

http://craftycreationschallenges.blogspot.com/2012/01/153-valentine-theme.html

http://blog.docerelashop.com/2012/01/design-team-post-5-challenge-january.html

Wednesday, January 18, 2012

Butterfly Kisses Tag

Hi everyone and welcome back to another new project.  Today's cute project is another tag for any occasion  or Valentines Day.  Just add your message to the back. :D  Enjoy

Materials Used:

Stamps
  En Fracais (Stampin Up)

 Misc Butterflies I had                                     


Ink

  Rose red (SU)
  Melon Mambo (SU)
  Perfect Plum (SU)
  Ancient Rome (Angel Co.)


Embellishments
  hardware (SU)

  bling
  twine
  ribbon
  heart charm
  dazzling diamond (SU)


Other Stuff
  embossing powder
  3 Birds Cartridge    (2in)
  Mod Podge Hard Coat


Photobucket


 Challenges:
 http://paperplaytime.blogspot.com/2012/01/ch-65-tags-include-sentiment.html

 http://amusestudiochallengeblog.blogspot.com/2012/01/love-is-in-air.html


Monday, August 8, 2011

Scrapbookaholic By Abby DT Challenge #11 Back to School

Well , it's that time again yep that's right SCHOOL. :D  So guess what our next challenge is all about......you got it.  Make any project related to back to school.  Easy peezy right.  You can make anything you want, a scrapbook layout, a cart , a tag, or just something totally different and outside of the box.. Show off your talent with this fun challenge. To enter the challenge head over to http://www.scrapbookaholicbyabby.com/ and add you project under Mr Linky. You will also get to see what the other DT members created. :D Here is the project I did:

Ingredients: 
Notebook
Paper (citrus stack DCWV)
corduroy buttons (Stampin Up)
paper flowers ( Oriental Trading Company)
Mickey Font Cartridge ( welded together with gypsy)
Stickles ( red)
Bling ( always a girls best friend)
Scallop boarder punch

A ZBig Thanks to our sponsor Nikki Sivils she is donating a 6x6 paper pack and buttons.

Have a great week everyone :D

Hugs and Blessings,
Phil 4:13
Photobucket

Monday, July 25, 2011

Scrapbookaholic By Abby DT Challenge 10 Anything Summer

Hi everyone, It's that time again.  Challenge time. :D  For thsi challenge, you can make anything summer.You can make anything you want, a scrapbook layout, a cart , a tag, or just something totally different and outside of the box.. Show off your talent with this fun challenge. To enter the challenge head over to http://www.scrapbookaholicbyabby.com/ and add you project under Mr Linky. You will also get to see what the other DT members created. :D Here is the project I did:

I altered a tissue box to add some summer decor to my home. :D
I measured the sides and cut out paper accordingly.  Used ribbon to hide the seems.  Punched out some butterflies and added a couple of flowers. Super easy.  enjoy :D
Hugs and Blessings,
Photobucket


Friday, July 22, 2011

Christmas in July Blog Hop


HI everyone and welcome to the Christmas in July week long guest designer get together. This event is hosted by CROSS MY HEART PAPERCRAFTS by GISELLE VARELA and Nadia's Beautiful Mess. Thanks so very much for letting me participate as a guest designer3 times this week. :D along with some other grrrreat bloggers.. Stop by Giselle's blog HERE to see all the guest designers for the day.

I love Christmas and the best part about it is that we all get to give. Part of giving something to someone, is the love you put into it. What better way to show how much you love someone by giving something handmade.

I altered this from to not only reflect a gift, but to also reflect summer. It is July after all. :D

Click the pic to enlarge
I stuck the frame down with crafters companion spray and then cut around all of the edges.  The beautiful paper is by DCWV (Lemon Flower Stack).    The big flowers are from Oriental trading Company along with all of the bling around the frame.  I also uses yellow stickles around the frame in spots to give is some extra sparkle. 
Click the pic to enlarge


The cute little butterflies are punched out using a fiskars punch.  I glued them down and then added glossy accents by Stampin Up to them to make them shine and to give them  some stability.


I hope you enjoyed my frame and you get lots of ideas. Merry Christmas in July :D
For my give away, I am giving away a grab bag of goodies.  Just leave one comment one per person, become a follower if you would like.  I always love new friends, and leave me you blog addy if you have one.  I love to follow new blogs too.It will end the day after the week long Hop of guest designers is over which it the 26Th of July..
Hugs and Blessings,
Photobucket