Showing posts with label Holiday Projects. Show all posts

Sunday, May 1, 2016

Mother's Day Card 2016


Items that I used:
     Stamp Sets: Rose Wonder & Something to Celebrate (Both are Stampin UP)
                          *something to celebrate is used on the inside and says Happy Mother's Day)

     Ink: Lovely Lilac & Orchid Opulence (Stampin Up)

     Copic Marker: BV00 (Fill in Rose)

     Stickles: Grape Crush (Outline Rose)

     Other: Purple Pearls and Purple Bling, Dazzling Diamonds (on purple edge of card) 

Monday, November 16, 2015

My X-Mas Cards For This Year


 Paper: Paper Bag Brown, Cherry Cobbler Red and Light Olive

Glitter Glue by Ranger: Lime Green, Christmas Red, Yellow, Icicle

Ink: StazOn Black,  StampinUp: Crushed Curry, Mellow Moss, Cherry Cobbler


Ribbons: Stampin Up and PaperTrey Ink

Stamps: Stampin Up Christmas Collectibles with coordinating  Punch

Pop Dots and Glossy Accents

White Ink Pen

Sunday, November 1, 2015

Last Spooky Card for Halloween


Stamp Set: A*muse Spooky Girlfriend

Copics: E21, E37, E47, YR07, YR04, YG06, Y17, Y08, C-7, 0

StazOn Black ink

Ink: Stampin Up Black Craft Ink and Pumpkin Craft
       -used BrushStix to ink up the white paper

Glossy Accents for the dress

Black Bow is Stampin Up

Glitter Glue: Orange peel, Black Diamond and Purple

Punch: Martha Stewart Edge Drippy Goo

Bling: orange and purple glued on

Paper: Halloween paper from Stampin Up

Edges of white paper are roughed up using Tim Holtz Distresser Tool

Monday, October 26, 2015

Halloween Tag

 What was used:  Inksentials tag, Stampin Up Halloween paper and ribbon,bling and bones, mesh flower from Making Memories with a stampin up antique brad button and some parts from a bracelet added to it as well as black feathers.
The web stamp that was used is from Inkadinakdo and silver pigment ink from Fiskers.
The black bling is added for fun using the 

Imaginisce machine to heat up the black crystals.

The spiders are from a punch from EK Success. Crystal Effects was added to the their bodies.


HaPpY hAlLoWeEn

BOO,

MEIGHEN

Wednesday, October 14, 2015

Halloween Layout

Before 
After: paper is ghosts and goblins by DCWV

Left: Crackle accents and glossy accents.  Right: Glitter on the bottles to bling it out a bit.

Spider: EK Success Punch. Web paper is from stampin up.

Stampin up buttons with google eyes :)
black Bling scattered throughout.


Sunday, October 4, 2015

Halloween Card 2015

Here is what I used:
1. Stampin Up Halloween PAPER
2. Wicked Cool stamp set by Stampin UP
3. Pumpkin Pie ink Stampin Up
4.Stickles
      - lavender
      - grape crush
      - black diamond
      - silver
      - orange peel
5. Pop Dots
6. Glossy Accents (hat and shoes)

Tuesday, August 6, 2013

Xmas Cards 2013

Well , it has been a very long time since I have presented something fun to you and to my blog.  With College classes taking up a brunt of my time, and trying to get caught up on my house work, I felt the need to get get into my scrap room and have some fun.  Since my first Nursing classes will start in the fall, I decided to get my Xmas cards done really early because God knows I will have no time when the semester starts.  I an truly sorry for the neglect.  I will really work hard and try to get some things posted throughout the fall and spring.  Thanks for understanding.


What you will need:
Cream Card Stock (4X6)
Red Card Stock (4.5 X 6.25)
Peachy Keen Stamps:
      Country Bumpkin (Mooey Christmas)
Red and Black Ink
Copic Markers:
#  B05 E02 RV10 R27 C-3 C-5 R29
Glossy Accents (pupil of eye)
Snowflake punch
twine
While Gel Pen (pupil of eye)
Glitter Glue 
Bling
Paper Piercing Tool (to pull twine around cows neck)
ATG Gun and glue dots
Boarder Punch of choice


Love this cow. Hope you all do too. Miss you all
Hugs and Blessings,
Meighen

Sunday, January 27, 2013

Valentine Tag


HAPPY VALENTINES DAY TAG


Large Tag
bling and perals
rosettes
valor ribbon
pink and brown ink
white paint
sticky strip
glue
Scrappy Moms Stamps (Love Notes)
 I inked up the tag with pink then stamped it with a huge Stampin Up background stamp in brown.

The edges are also inked in brown.

Apply the rosettes and use white paint to make the tag pop.  add ribbon and the rest of the embellishments.

Stamp the sentiment and voila.


Challenges I am entering into:

http://opus-gluei.blogspot.com/2013/01/challenge-149-glitz-glamour-bring-on.html

http://anythingbutacard.blogspot.ca/2013/01/anything-but-card-challenge-11-tie-it.html

http://craftingwhenwecanchallenges.blogspot.com/2013/01/challenge-36-strawberries-and-cream-red.html

Saturday, January 19, 2013

Valentines Day Card

HI everyone, it's that time again.  Time to show how much you love someone by giving them a card , flowers, chocolate (my favorite), or a Valentine exchange at school for your kids.

Today's card is featuring a Simply Betty Digi.  Her name is Rio and she loves chocolate as much as I do.


Little Rio is colored using My new Copic markers. This is my first year playing with these markers, heck for that matter even using these markers period.  I am pretty happy with the way she turned out.

The boarders are punched using a Martha Stewart Doily punch.   The hardware and little plastic flowers are from Stampin Up.

Glitter was used on her eyes as well as all around here.
The gorgeous had crocheted flowers to the right were purchased off of Etsy.  I  also have red and pink stick pins on there but not sure where I got them.

The cute sentiment is from Scrappy Moms Love Notes.

I hope you enjoy this card as much as I did making it.

Have a great February,
Meighen

Monday, December 10, 2012

Christmas Decor 2013

Here is my decor for this year. I hope you guys like it and get some good ideas. Merry Christmas to all of you.

Sunday, October 28, 2012

My 2012 Christmas Cards


Stamps:
Ink
Scrappy Moms Winter Wishes
Stampin UP:
Delightful Decorations

Other Stuff:
border punch (Martha Stewart)
cricut cartridge
glitter
ribbon (Stampin Up)
glue dots
paper (Stampin Up)
twine (Stampin UP)
Gold gel pen


  I added a button or rusty bell to the card later in the card making process. I found it to add a little something to the card.

I also added a bling in the yellow bulb.

This card turned out so beautiful.  I am working on putting them all together still.  I hope you find some inspiration.

Hugs and Blessings,
Meighen

Thursday, October 11, 2012

Bosses Day is on the 16th

HI everyone.  Welcome back for a fun new project that I know you will love.  As you may or may not know  Bosses week is October 16th this year.  My coworkers and I are celebrating it in style at the hospital where we work. As a little added special touch I decided to make a sign for my boss Marissa to hang on here door.  Luckily, we like our boss .  lol :D

Here is what you will need:

This chipboard,  (thin enough to cut on the cricut)
Hello Kitty Font (cut @ 1 inch i think)
pumpkin ink
stickles
glue
little roses
2 sizes of butterfly punches
Ribbon
bling
Gypsy

 The letters are welded together on the gypsy.
The paper was cut out 2 times in order to cover  the front and back.   The back just has white paper to cover the chipboard.  The edges were inked with the pumpkin and stickles were used to trace around hte edges.
I connected the 3 pieces of welded signage with ribbon using large glue dots.  The little roses were added along with the butterflies and bling as embellishments.


I hope my boss likes it and you get some inspiration as well.
Hugs and Blessings,
Meighen

Thursday, October 4, 2012

Nana's Scrap Spot 2yr Blogaversary Bog Hop

Welcome everyone to Nana's Scrap Spot's Blog Hop.  We are all celebrating her two year blogaversary.  Isn't that super exciting? 

Happy Blogaversary to You , Happy Blogaversary to You, Happy Blogaversary to Nana's Scrap Spot, Happy Blogaversary to You and many moooorrrreeeeee.

Now, you should have come here from Maria's Blog.  If not you can start here with our hostess Miranda at   http://www.nanasscrapspot.com/.

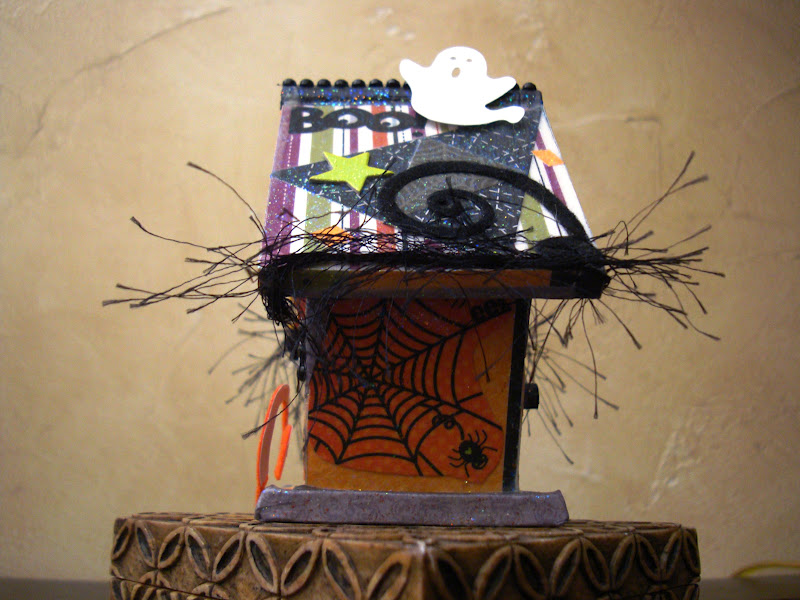
For this hop, she has decided to make the hop theme a free for all/ anything goes project.  I have decided to alter another bird house.  

The birdie couple that moved in to the last one just love Halloween so  much that they decided to hang up the ghoulish decor early.  These birds works for a couple of days to get things finished.  I must say they really did an awesome job. They should come and decorate my house.  lol


They Started of by taking the other decor off of the wooden birdhouse and added a whole bunch of scrap Halloween paper around the exterior using Mod Podge.  After they let that dry they added a glitter coating of Mod Podge and a glow in the dark layer of  Mod Podge.  They wanted everyone in the bird community to see it at night too.


After all of the Mod Podge had dried, they wanted to add some fun fur to the outside edges of the roof with some glue and also some stickers and ghost punches.  The ridge of the roof has some black bling on it and was colored with a black marker.  Orange Stickles was used on the peak front and back, the opening into the bird house as well as the pumpkin on the side .
They did a great job with the decor.  I wonder if they will decorate for fall and winter or Christmas.

That concludes this tweet project.


BLOG CANDY ALERT

What celebration would be complete without gifts, right! Well not to worry, we have gifts.....one lucky person will receive a $25 gift card from Michael's Arts and Crafts and if that isn't enough KaDoodle Bug Designs is offering a $15 gift certificate on regular price patters. To be eligible to win, please leave a comment on each hop post and please head over to KaDoodle Bug Designs Facebook Page, click LIKE and leave a comment: http://www.facebook.com/kadoodlebugdesigns.


As a thanks for stopping by I am also giving away some blog candy.  All you have to do is join my blog if you would like and leave me a comment on this post.  Easy peasey.


Your next stop is Christine- http://hotberrydesigns.blogspot.com/

Happy Hopping


Blog Candy


Here is the blog list:


Thursday, May 10, 2012

Mothers Day Card

Well everyone, it's that time again, time to show how much we love our mothers.   I have the perfect handmade card for everyones perfect mommy.  I think this is my favorite card.
This card 4 by 9 1/4 inches so it will fit in a standard letter size envelope.

Here is what you will need:
SU = stampin up products

Basics:
Crumb cake card stock (SU)
Soft Suede Classic ink (SU)
Rose Red craft ink(to emboss with)  (SU)
Embossing powder (clear)

Stamp Sets:
Easter Blossom (SU)
Something to Celebrate (SU)
En Francais (SU )

Embellishments:Ice Sickles in Strawberry Ice (ranger)
Tiny pearl strand
mini Prima roses
a medium flower mine is from Petaloo

Tools:
 ATG Gun
 Foam pop dots
Quick Dry adhesive
 heat gun


 The edges and whole front of the card are inked up to give it that vintage feel.

 The Rose Red cherry blossoms are heat embossed as well as the strip of paper that I inked up in the same color and also heat embossed.  Stickles glitter glue was added to the bigger flower only.

I hope this gives you lots of ideas.

Happy Mommy's Day to all of you.
Hugs and Blessings,
Meighen